Saturday, November 1, 2014

Ultra Red Monster Steak

I'm not a huge fan of energy drinks, but I do drink my fair share of them from time to time. Yes I know.. not the healthiest of options... but oh well. My personal favorite is the Monster Energy Zero Ultra ( red, blue, or white... I like them all).

Well, the other day I was drinking the Red Ultra and ended up only drinking half the can. Instead of wasting it, since I paid a good $1.99 for that, I decided to make use of it. Steak marinade!! And behold... the Ultra Red Monster Steak was born!


Step 1: Put the steak in a plastic bag. Pour in the Monster (I had about half a can left), close the bag and refrigerate. I left it for about 4 hours.


Step 2: Throw it in a fry pan (I used coconut oil to grease the pan).


Step 3: Add some seasonings and such all up in there. I used some soy sauce, garlic, steak seasoning, adoba, rosemary, and cayenne pepper. I also poured just a little bit of the monster into the pan.


Step 4: Cook until it's done and enjoy! I was really surprised by how tasty this really was. And I will admit to you.. I actually ate the entire thing..


Friday, July 4, 2014

15 Calorie Flavored Iced Coffee (with Milksplash)

I can't say that I'm a huge coffee addict, but I do enjoy the occasional cup o' joe. However, I have no interest in paying big bucks for a coffee beverage that is just overflowing with calories. If I have a coffee, it's usually one I made myself.


This has fast become my favorite iced coffee. And, it's quick and easy! So on the days when I am rushing to get to work early in the morning, I can still have my coffee.

I found these cute little guys at Walmart. And since I'm a sucker for cute packaging (and anything banana...) I just had to get them. They also had a strawberry flavor, but I did not buy that one. According to the website there is also an orange creamsicle flavor, but I suppose my Walmart did not have that one in stock.


I don't drink a lot of milk by itself. I usually add it to smoothies or eat it with cereal, so I wasn't exactly sure what I was going to do with these when I bought them... I just knew I wanted them (we have an impulse buyer right here). I decided to try them in my coffee... and I found a winner!


Basically I just put everything into my magic bullet and blend it up. I'm a cheater so I use instant coffee so I don't have to bother with cooling my coffee down... I just stick a spoonful right into the blender with the water. But if you make your coffee with a coffeemaker... you go right ahead.

  • 1 cup coffee (chilled)
  • 1/2 cup almond milk
  • truvia or other calorie-free sweetener (optional)
  • Milksplash flavor of your choice
  • ice
blend them all together (or stir...) and you got yourself a nice iced coffee! Of course you can use other types of milk or sweeteners, it just won't be the same calorie content.

Personally I like to add 2 squirts of Jammin' Banana and 1 squirt of Cocoa Loco to my coffee, but it's fun mix it up and try different combinations!


Saturday, June 14, 2014

Cleaning Your Makeup Brushes

I'm a makeup girl. I love wearing makeup. I may not be an expert or a professional makeup artist by any means, but I've learned a bit from playing around with makeup for quite a few years. Although I have always had a fairly large makeup collection.. It wasn't until recently that I finally acquired the proper tools to use it all. For years I was using brushes from The Dollar Tree and the cheap applicators/brushes and sponges that come with a lot of products (not very effective...)

And because I now have good quality makeup brushes (most are from Coastal Scents btw).. I needed to learn how to clean them. This is the best method that I have found.

  • Set down a towel... this may get messy
  • Mix together 1 cup warm water, 1 tablespoon white vinegar, 1 tablespoon dish detergent (I used Ajax) and 1/2 tablespoon baby shampoo
  • Fill another bowl/cup/whatever with warm water


  • Give each brush a good swirl in the soapy water. I like to wipe them on a paper towel to make sure all the product is off, and if not, put them back in the soapy water. I also let some of the brushes sit in the water a bit if they are very dirty. 
  • Once they are clean, rinse them in the clean water, reshape them, and lay them on the towel to dry.


I do the smaller brushes first since they tend to not dirty the water very much. I will usually change both the soapy water and clean water when I get to my foundation and powder brushes since they are a lot dirtier than the others..

Usually this works perfectly for my makeup brushes, but I do give my foundation brushes some extra TLC since they are very stubborn and never seem to be clean enough.


I put a bit of face wash (I'm using Neutrogena naturals) in my palm, wet the brush, and just swirl the brush in my hand, then rinse. Sometimes I will do this multiple times...but when I deem that they are clean I again reshape them and lay them out to dry.


And there you have it! Clean makeup brushes!
Just let them dry and they are ready to dirty again!

Saturday, March 15, 2014

Throw it in the Crockpot: Episode Two

I was looking in my freezer the other day and came to the realization that we have waaayyyy too many peas. There are just bags and bags and bags of frozen peas everywhere. So, on today's episode of Throw it in the Crockpot, I decided to use some of those frozen peas. And so we have:

Ham and Peas and Such


Basically this is a very simple meal of:

2 partially used bags of frozen peas
some frozen carrots 
almost 2 pounds of ham (cubed)
1/2 onion
half a box of pasta
about a tbs of butter
2 packets of soy sauce from a Chinese takeaway
some garlic salt

and that's it! Some cheese or alfredo sauce would have probably been a good addition.. but I didn't have any on hand that I wanted to add... so that's it!

Slowly but surely, the old things hidden at the back of the freezer and cupboard are being used...

Thursday, March 13, 2014

My first tattoo!

I've known I wanted a tattoo for quite some time. Since I was a child, I always thought I would get some awesome dragon tattoo; however, as I got older I began to realize just how many people had dragon tattoos... and I'm not a person who likes overly popular things. I like unique things. And unfortunately, a dragon is not very unique. I am also a person who thinks there should be a lot of meaning behind a tattoo, not just because it looks cool.

After thinking about it for some time.. I finally decided on my design.


I hear you saying to yourself, "what the heck is that?!" Well, it's a line from one of my favorite songs ever. "Someday.." by ZE:A. It's a Korean song and I absolutely love it.


line at 1:50

I'm one of those people that think it's ridiculous to get a random tattoo in a language you don't understand, so I was very hesitant about getting this tattoo. However, I have studied a bit of Korean, been to Korea a few times, and I have seen this song performed live on more than one occasion and actually met the band that sings it.. so it really does have a lot of meaning behind it for me.

 Now that we have that cleared up.. onto the process. I don't really have pictures to show of the actual experience (because my phone was dying... we were waiting a really long time and pinterest used all my battery). But here's a picture of the room.

so bright and cheery!
Did it hurt? Yes.. it did. The pain was not unbearable, though. However, I do have a high pain tolerance. What surprised me was that it felt more like a knife than a needle. I was not expecting that. But, I survived. Here is the final result!


I'm very happy with the way it turned out. Sure, it may not be perfect, but neither am I.


and no, this will definitely not be my last tattoo...

Friday, March 7, 2014

Throw it in the Crockpot: Episode One

My family likes to buy food. We shop at discount stores and buy things on sale a lot.. and it's not always things we need.. or that we have any plans to use any time soon. So, needless to say, our freezer, pantry, and refrigerator are always full (too full). So many times I find things buried that have been forgotten for way way way too long... and are long since expired.

So, to help clean out our extreme stash of food, I like to take a whole bunch of crap and just throw it all into the crockpot together. Surprisingly... this has led to some wonderful meals (some of which my family tells me I should make again... which I won't). No one knows my secret and they usually think I followed a recipe... or that I am just a brilliant cook.

Today in the crockpot we have...
This glob of mush
I will call it...

BBQ Chickeny Fiesta


What's inside?

1 cup white rice
2 pounds ground chicken
3 sweet peppers (chopped)
1/2 onion (chopped)
some frozen peas
tad bit of leftover turkey meat
3 chicken sausages w/ cheese and peppers
1 packet soy sauce from a Chinese takeaway
the rest of a bottle of BBQ sauce (maybe a cup?)


So there you have it! If you ever need a way to get rid of random food that is taking up too much space... just throw it in the crockpot! It's fun to think of different combinations.

online shopping: MANGO.com review

One of my closest friends is getting married in a few months, and I was lucky enough to be chosen as one of her bridesmaids! So, of course we have all been searching for the perfect dresses. She is having a rainbow theme, so each bridesmaid will have a completely different dress. My color is red. 

After scouring the web trying to find a dress that matched both her taste and mine.. I finally found it.

via MANGO.com


I was a bit hesitant to purchase a dress from a store I had never heard of before; however, being on sale for such a good price ($19.99!!) I decided I would give it a shot. So, I bought it and only a few short days later it arrived.


Do I like it? Yes! The bride and I both love it. The quality is wonderful, and it is very true to the photo (trust me, it is that red, even if my photo quality does not show it).  It fits me perfectly. I was very unsure of what size to get since I have lost quite a bit of weight and will probably continue losing more before the wedding... but I settled on a 6. When the time comes I may need to take it in a bit, but we will worry about that later.

Would I order from them again? Yes. Though probably just items on sale because they are a bit pricey for my taste. But I would definitely recommend you check out Mango!

Dress price: $19.99
Shipping and Handling: $5.95
Total: 25.94

this dress is no longer available, but in case it ever comes back in stock you can find it here

Thursday, February 13, 2014

Snow Cream


So... we've been having quite a bit of snow this year. More than a bit actually... it's getting to be ridiculous. Today marks the most we've had this winter. I don't know exactly how many inches we have, but it's over a foot (in some places the snow is level with my hip!).  Though the snow can be a pain, it can also be delicious! I remember making snow cream years and years ago with my grandma, and I decided to make some again! After all, we have enough snow for it.


Ingredients:

  • 1 cup milk
  • 1/3 cup sugar
  • 1/2 teaspoon vanilla
  • 6 cups fresh snow


Directions: 

  1. Combine the milk, sugar, and vanilla together (I added a bit of chocolate syrup too)
  2. Get all bundled up and head outside
  3. Go get yourself some nice, clean snow (you may want to dig underneath the top layer) in a big bowl
  4. Come back inside
  5. Pour the milk mixture into your snow and stir it all together.
  6. Serve immediately! It melts fast!


Enjoy! :)


Wednesday, January 29, 2014

Chocolate Banana Bread Muffins


I have a banana addiction. It's bad. It's very rare for me to go even one day without eating at least one banana. My freezer is overflowing with bananas because if I see them at a super good price, I will buy them (even if I already have a million in my freezer). There is a discount store that I like to go to, and I've picked up 40lb boxes of overly-ripe bananas for practically nothing. Needless to say, I have a lot of bananas.

So, when life hands you lemons bananas, go make some lemonade banana bread!

Here's a recipe for my new favorite, chocolatey banana bread muffins! These are very moist with just the right amount of banananess. Did I mention there was chocolate, too? Chocolate and bananas... you can't go wrong with those. No sir.


 Ingredients: 

  • 3/4 cup sugar
  • 1/4 cup milk
  • 3 tbsp oil
  • 1/2 tsp vanilla
  • 3 eggs
  • 3-4 quite ripe bananas
  • 2 2/3 cup Bisquick mix
  • 1 cup chocolate chips
  • brown sugar for topping

 Directions:

  1. Preheat your oven to 350°F. Line a muffin tin (or just spray the pan). 
  2. Mash up your bananas. If you are using frozen bananas, make sure you let them thaw a bit before trying to mash a rock solid banana (it's dangerous, trust me).
  3. In a large bowl, combine your sugar, milk, oil, vanilla, and eggs.
  4. Stir in your bananas. It may be easier to use an electric mixer to get a more even batter.
  5. Mix in your Bisquick and chocolate chips. Stir until the batter is well blended and even throughout.
  6. Fill the muffin cups. You want them to be about 1/2 to 3/4 filled.
  7. Top them off with some brown sugar (I used about a half teaspoon for each muffin) and put them in the oven!
  8. Bake for 20ish minutes, or until a toothpick comes out clean.
  9. ENJOY!


That wasn't so hard, now was it? 


Monday, January 27, 2014

Operation Clean-Up: The Fridge Addition

Everyday I open up the door, peek around and think, "there's nothing to eat"; when really there is a huge mountain of food ready to come tumbling down on me. The problem is: it's hard to find the really good stuff hidden amongst all the other junk stuffed inside.
That's where Operation Clean-Up comes in to play.

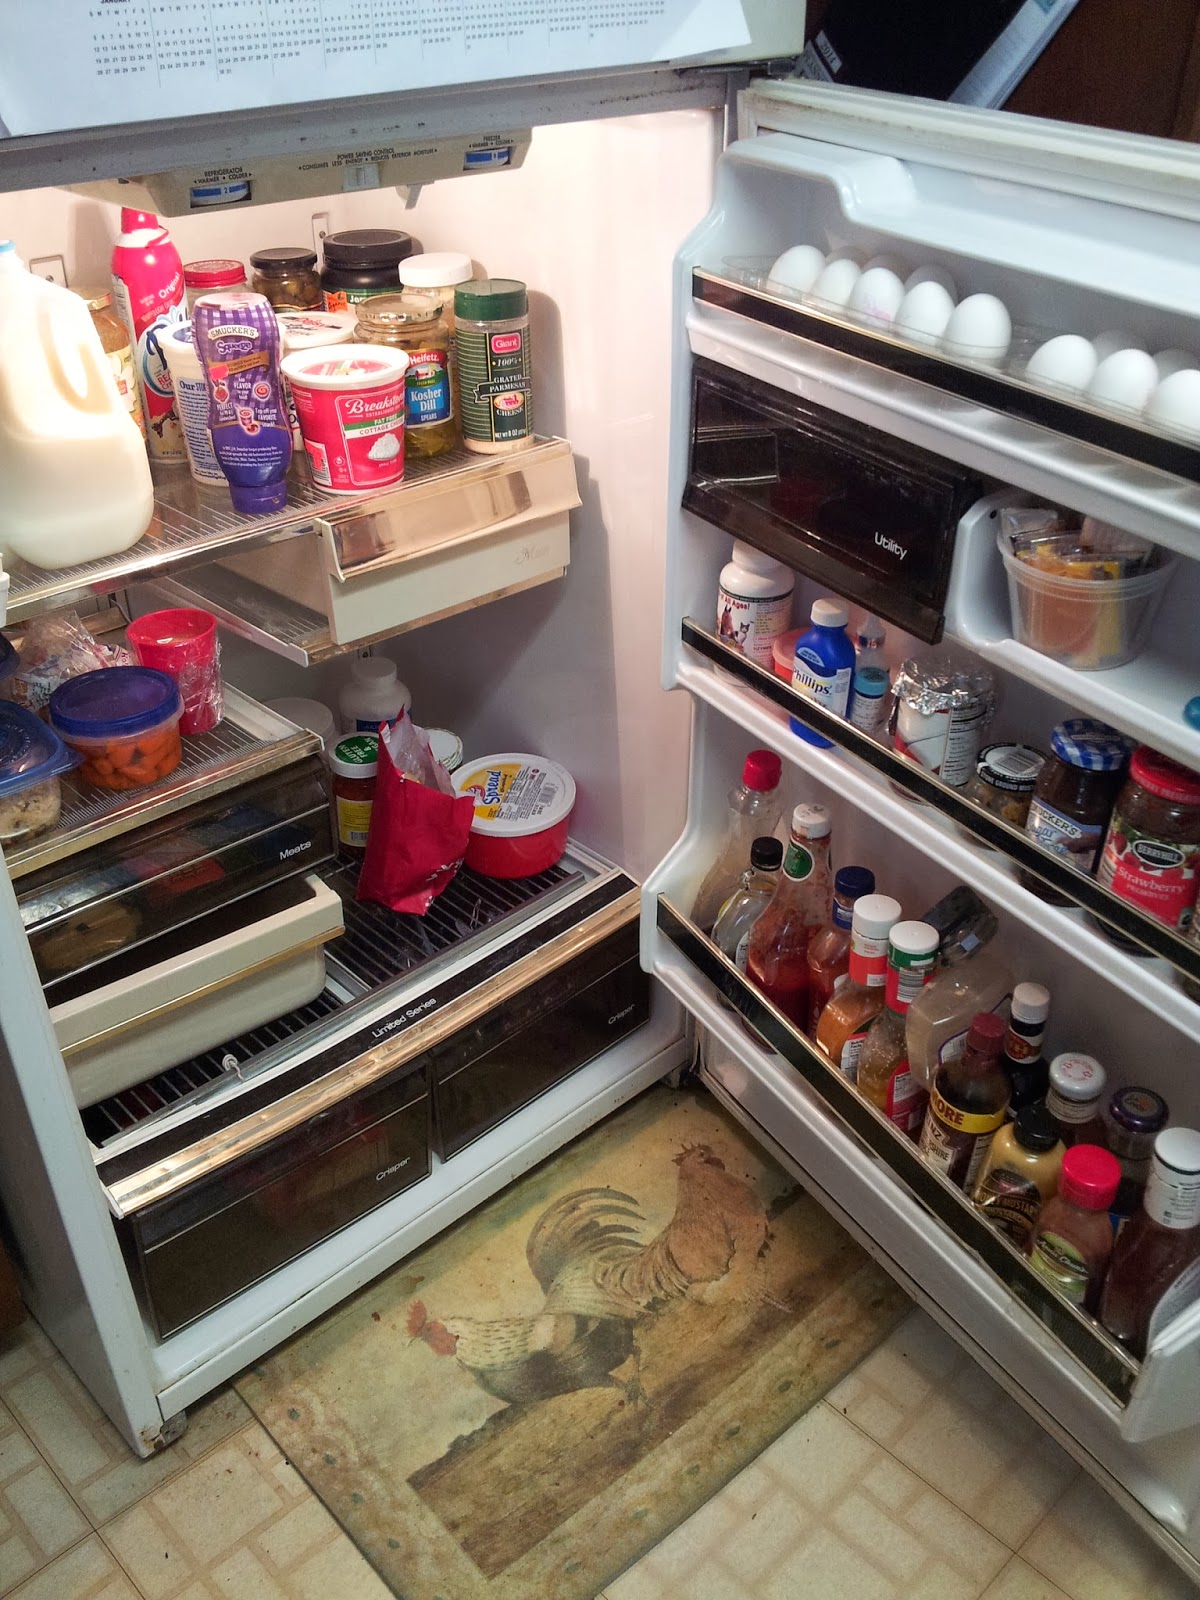
Let's take a look at the refrigerator in my house, shall we?


There is no rhyme or reason to how things are placed in here... everything is pretty much thrown in anywhere you can find a space for it. So.. let's try a wee bit of organization, eh?

Step 1: Take everything out of the fridge (including drawers and shelves if possible). Put it on the kitchen table, counter top, in boxes, or wherever you can find space for everything.

Ew! It was about time to clean this...
 Step 2: Clean clean clean! I just used baking soda and water since some soaps leave a fragrance that can affect the food. You may need to do a lot of scrubbing (I certainly did...). Use a rag, scrub brush, sponge, toothbrush, whatever you need to do to get the job done (I used all of the above).

wow! It's like a new fridge!

Step 3: Dry it. Take rag or paper towels and wipe everything down. You don't want to put your food back on shelves and into drawers that are dripping wet. Obviously.

Step 4: Go through your food. Decide what needs to be tossed. Try to combine things if you have multiple containers of the same thing. You may even have some things that don't need refrigerated, so take those out to free up some space (I moved some soy sauce, hot sauce, and sesame oil into the cupboard). If you have food that is still good but don't plan to use it for awhile, consider putting it in the freezer instead of back in the fridge.

Step 5: Put everything back in an organized fashion. If you are like me, you will find yourself with a lot more space than you had before.

Step 6: Admire your hard work. Here's a look at my newly clean fridge.


So there you have it! Now get cleaning. I certainly hope my refrigerator wasn't the only one looking that raunchy...